Monday, December 24, 2012

Merry Christmas... (& Sweets for Santa!)

Here in Australia, it gets pretty hot at Christmas time.  Tomorrow is forecast to be 39 degrees Celsius.

So when it fell to me this year to make the dessert for Christmas lunch, I thought something made of icecream would be very welcome in the middle of the day!

Lately I've been a bit obsessed with gingerbread (oh yes, there has been a lot of baking going on.  Just not much blogging).  So I decided it would be rather nice to make a layered molded dessert of gingerbread and vanilla icecreams - mmm....  Ooh, and I could enter it into the latest Sweet Adventures Blog Hop!


Didn't it turn out pretty?  I was panicking a bit about getting it out of the mold before Christmas Day, but it seems to have gone back into the freezer with no problems...


If you're not thinking about licking that picture, with its chewy-crunchy gingerbread base, and deliciously frosty layers of vanilla and gingerbread creaminess, you totally should be.  Trust me.  But wait - it gets cuter.  This is what it's going to look like when it hits the table tomorrow:


Teeny gingerbread men and hearts, with a royal-iced gingerbread star, complete this treat!

So here's the recipe - and it might be too late to make it for Christmas Day, but you could definitely make either of these icecreams on their own just to eat from a bowl - the vanilla is really good, but I am very proud of the gingerbread - maybe I'm biased in favour of anything gingerbready right now, but personally I think it's sensational...

Gingerbread Icecream Tree

Vanilla Icecream
Ingredients
400mL cream
100mL whole milk
1 vanilla bean
5 egg yolks
125g caster sugar

Modus Operandi
Place cream, milk and vanilla bean in a medium sized saucepan, and heat slowly just until boiling point, then remove from heat immediately.  Meanwhile, whisk egg yolks and sugar in a bowl until pale and creamy.  Gradually add the cream mixture to the egg mixture, and continue to whisk until combined.  Transfer the mixture to a clean saucepan, and cook over low heat, stirring all the time, for around 15-20 minutes, until it coats the back of a spoon.  Do not allow to boil!  Refrigerate the mixture until cold (preferably overnight), before churning in an icecream maker.
Pour churned icecream into your chosed mold, and freeze.

Gingerbread
Ingredients
115g butter
1/2 cup caster sugar
1/2 cup molasses
1 egg yolk
300g sifted plain flour
1/2 tsp salt
1/2 tsp baking soda
1 tsp cinnamon
2 tsp ground ginger
1 tsp grated nutmeg

MO
Cream the butter and sugar just until smooth.  Stir in the molasses and egg yolk.
Combine the dry ingredients and stir into the molasses mixture until smooth.  The mixture will be very soft and sticky - that's okay.  Wrap it in plastic, and chill for at least one hour.
Meanwhile, take a piece of baking paper and draw around the shape of the mold you have used for your icecream.  Cut the shape out, and put it aside.
Preheat the oven to 175C (350F).  On a lightly floured surface, roll the dough out to about 8mm thickness.  Using your baking paper template, cut the shape you will need for your base out of your gingerbread dough (in my case, a large Christmas tree).  Transfer the shaped gingerbread onto a lined baking tray (note:  you will make your life much easier if you keep the paper shape on the gingerbread tree shape until you have transferred it to the tray.  It will inevitably warp a little in the process, and having the paper template still there means you can smooth it back into shape before baking).  Remove the template and keep it for later.
Bake the large gingerbread in the oven until firm, and the edges are golden brown (the actual time will vary depending on the size and shape of your mold.  Mine took around 15 minutes).
Bake your small cookies for around 8-10 minutes.  Cool on trays.

When it is completely cool, move your large gingerbread shape to a board, and trim it back to the desired shape using your paper template.  Theoretically I imagine this would be easier while the gingerbread was still warm, but I wasn't game enough to move it at that stage.  Please yourself.  :o)

Gingerbread Icecream
Ingredients
600mL cream
Some of your Gingerbread cookies - I used about 90g of them (although I had some left over from my last batch, so depending on the size of your mold's base, you might need to make two batches of gingerbread if you want to decorate with them too.  Not sure... sorry.  But hey, who minds extra gingerbread around the house, am I right?)
6 egg yolks
150g light brown sugar
2 Tbsp molasses
1 tsp cinnamon
1 tsp ground ginger
1/2 tsp grated nutmeg

MO
Exactly the same as for the vanilla icecream, but add your gingerbread cookies to your cream mixture right at the beginning.  When you remove it from the heat, strain it through a sieve.  The cookies will have turned to mush - stir it a bit to help the liquid through the sieve, but don't force it all through.  Most of the cookie mush will go through the sieve easily - any that doesn't, discard.
Add the spices and molasses to the egg/sugar mixture just before adding the cream mixture.
When the icecream is churned, pour it into the mold on top of the vanilla, and freeze.

To construct:
Take your icecream out of the freezer, and whilst it is still in the mold, press the gingerbread base firmly onto it.  Return to the freezer until it is time to serve.

At serving time, flip the icecream tree out onto your desired serving plate (it's a good idea to freeze that, too, to stop the icecream from starting to melt quite so quickly!)  Decorate as desired.


Wow, that was kind of long.  But trust me, it's totally worth it!  And after all, we all deserve to be a bit indulgent at Christmas, right?

I really hope that you and yours have a wonderful, fun, peaceful holiday season - and do check out the other Sweets For Santa at the blog hop below - this month it's being hosted by Christina over at The Hungry Australian - she did an icecream dessert too, and it looks amazing!

Thursday, December 20, 2012

Bad Blogger. Bad, Bad Blogger.

Wow...  So it's been a while, huh?  I mean, I know my blogging "schedule" is fairly erratic at the best of times, but I can't believe I haven't posted anything here since Hallowe'en!

So I'm not going to bore you with seven weeks' worth of Muffin Tin Mondays.  We've totally been doing them, but I just seem to have been incredibly busy lately, what with sewing, prepping for The Muffin's first ever ballet concert, baking for her end-of-school parties.  And at the end of any given day, when it's been a choice of:  a) blog latest Muffin Tin and/or cookie;  b) relax with husband in front of the TV;  or c) fold washing / sew something in front of the TV...  well, let's just say that blogging never managed to win that fight.

Wait a minute... did I say "sew something"?  Why, yes.  Yes I did.  Truth is, I've been spending a fair bit of my free time on my new(ish) hobby, which is sewing - not clothes, but toys, ornaments, and cute things.  And guess what - I've even opened an Etsy shop!  And people who are not my relatives have bought things from me!  You can probably guess I'm pretty excited about that.  If you're interested in checking out my Etsy shop, it's here:  Lollybright Toys!  I'd really love it if you'd stop by and tell me what you think...

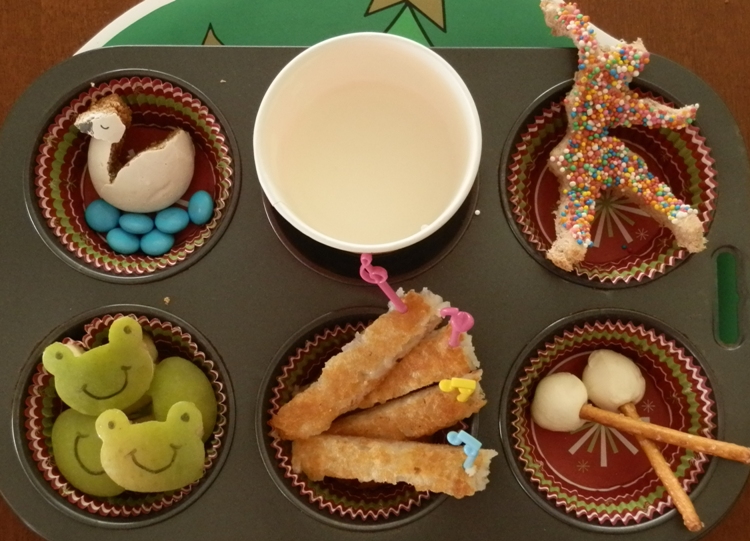
Now, I do have a couple of Muffin Tins to show you - just this week and last week's.  We decided to do a "Twelve Days of Christmas" theme.  We split the twelve days over two weeks, and it was such fun!

So here goes:  On the twelfth day of Christmas, my true love gave to me...


Bottom Row (right to left):  Twelve Drummers Drumming (drumsticks made from cherry bocconcini impaled on pretzel sticks);  Eleven Pipers Piping (strips of hash brown, with music note picks);  Ten Lords Leaping (or apple frogs, actually).
Top Row (right to left):  Nine Ladies Dancing (ballerina fairy bread);  Eight Maids a-Milking (milk);  Seven Swans a-Swimming (swan carved out of a pfeffernusse, with pale blue M&M water).


Bottom Row (right to left):  Six Geese a-Laying (hard-boiled egg);  Five Gold Rings (made of cheese);  Four Calling Birds (chopped up mango with music note picks).

Top Row (right to left):  Three French Hens (cut out of carrot, with cheese wings & beaks, black sesame eyes and heart-sprinkle combs);  Two Turtle Doves (dove shaped pikelets with butter);  and a Partridge in a Pear Tree (dried pear)!

She ate the lot out of the second tin (days 7-12), and all but one gold ring and one French Hen out of the first tin (days 1-6).  She had a huge amount of fun with this - the way she ate it was hilarious.  She sang the song, and ate a bit of each thing with Every Single Line.  She even managed to ration each thing out so that she had a little of each left for the last line of the song.  The fact that this meant she was eating sweet then savoury then sweet then savoury the whole time did not faze her at all.  Too funny.

If you want to check out some more Muffin Tin Goodness, click on over to the Muffin Tin Mom's blog - she's on a break right now, but people can still link up.

I promise I'll be back here again before Christmas, to share some yummy treats - 'tis the season to be on a Massive Sugar High, after all!  Until then, I hope you and your families are safe and well, and enjoying the festive season.

Wednesday, October 31, 2012

Muffin Tin Monday and... Boo! Bonus Bentos!

Hallowe'en is one of the most fun times for Muffin Tin Monday!  Here's what The Muffin had in her tin this Monday:


Top Row:  Bat cookie eating chopped Papaya;  Witches Brew (green sauce - basically a pureed cucumber raita with added spinach for vitamins and green-ness);  Naan bread Witch Hat with string cheese and purple carrot detail.

Bottom Row:  Rice tinted green;  Star-shaped Egg;  Witch Broom (piece of banana dipped in yoghurt, sprinkled with shredded coconut, with a pretzel stick handle).

The After Shot:

The Muffin loved her Banana Broomstick!  She was very pleased with this dinner all round, really, although she didn't love the papaya (this was her first time trying it).  She ate some, and said she quite liked it, but wouldn't like a lot of it.  Fair enough (I felt a bit the same way about it, actually).

To see what other spooky treats were dished up this Monday, check out The Muffin Tin Mom's blog.

But Wait - There's More!  Bonus Bento!

The Muffin wanted Hallowe'en-themed bentos on Monday and Tuesday this week, as well as on Hallowe'en itself, so here's what she had yesterday:


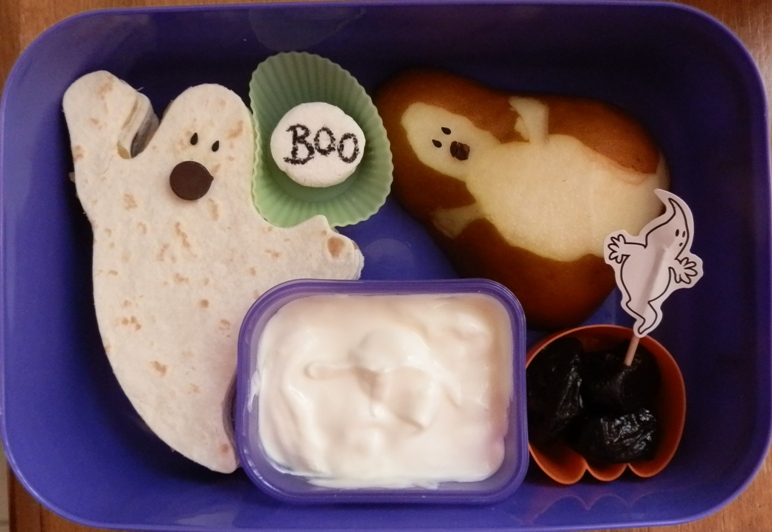
Spook Bento!  The Muffin has four ghost-shaped tortilla sandwiches (stacked - one cheese, one ham, one Promite, and one thick home-made applesauce) - I got eight ghost shapes from a total of two regular sized tortillas.  She also has a ghost pear (I am so in love with these - you should totally try this, it's really easy.  Pears seem to be a naturally perfect shape for slicing a ghost-shape from!)  The eyes of both ghosts are black sesame seeds;  the mouths of both were made from one chocolate chip - the flat part for the tortilla sandwich ghost, and the tip for the pear ghost.  Her snacks are a "Boo" marshmallow, three prunes (with a ghost sticker pick), and vanilla yoghurt.

On Monday, The Muffin had this for lunch:

This is not as neat as the spooks, but I really like the idea of slicing the top few millimetres of crust off the top of a bread roll, to make a flat surface for decorating (desperation being the mother of invention - I had run out of sliced bread!)  She also had chopped pineapple, and a little gummy heart lolly as a Hallowe'en treat (yes, an anatomical heart-shape, not a love heart).


My poor little vampire honestly looked WONDERFUL when I first made him, but this photo was taken after he'd spent the night in the fridge, and he looked a little washed out.  The sprinkle bow tie seemed to have bled its colour into the cheese a bit, and the eyes aren't quite right either...  Still, The Muffin was amused by him, and liked that there were raspberries "bleeding" into her yoghurt!

I'm linking this up with Halloween Bento of the Week over at Bento Blog Network - check out all the Hallowe'en Shininess!

I'll be back in a little while with The Muffin's actual Hallowe'en lunch, so I hope to see you back here soon!

Monday, October 22, 2012

Muffin Tin Monday - Waiting For Hallowe'en...

The Muffin is very much looking forward to Hallowe'en.  As it's on a weekday this year, we're not having a party or anything (and trick-or-treating is not much of a thing here in Australia), but we still like to have a bit of fun, even if it's just a spooky cupcake or something.  :o)

Anyway, the point is, we decided one Hallowe'en-themed Muffin Tin wasn't enough - so we started this week:


Top Row:  Half a pear, with a ghost-shaped piece of skin cut away (and a "boo" pick made with a toothpick and a sticker);  Cauldron full of popcorn;  Spinach leaves.

Bottom Row:  Ghost bread and butter (with choc chip mouth);  Eyeball lolly;  Pea and prosciutto frittata.

The pea and prosciutto frittata was a recipe we found in the newspaper over the weekend, and The Muffin wanted to try it.  So I made them for dinner tonight, and they were yummy.  The prosciutto slices are pressed into a muffin tin as a sort of casing for the frittata filling.  So some of this meal was cooked in a muffin tin, too!  The recipe can be found here.

The After Shot:


The frittata was met with unqualified approval - she didn't even pick any peas out!  Hurrah!

For next week's tin we're planning something witchy...  Until then, why not check out The Muffin Tin Mom's blog, and see what other people did this week?

Monday, October 15, 2012

2012 Royal Show Entries

Once again, The Muffin and I both entered some of our baking efforts into The Perth Royal Show this year.  Here's what we entered...

Cinderella Cupcakes:  I entered these into the "Decorated Patty Cakes"  (ie cupcakes) section - and I won! 


The cupcakes themselves were my usual vanilla recipe (ie Billy Reece's Vanilla Vanilla recipe), frosted with my own vanilla buttercream.  The decorations are almost all sugarpaste (with a little CMC added).  There's a little royal icing to stick everything on, and also a tiny bit of piping on the "glass slipper" - oh, and the wheels of the carriage were lovely piped swirls of royal icing, painted with silver lustre.  But I took these photos after the Royal Show, and sadly the wheels were smashed to tiny pieces by the time I got them home!  So you'll just have to imagine them.


I was quite pleased with my little pumpkin - and it was very easy to do, too - I think with a different colour icing for the base, it would make a lovely Hallowe'en cupcake, too!


And here's a closeup of Cinders herself - she was the most time-consuming to make (unsurprisingly perhaps, although honestly I was expecting to have a lot more grief than I did with the glass slipper, having never made an icing shoe before.  It was easier than I thought it would be).  Cinderella's head and torso (with arms attached) were skewered with a piece of uncooked linguine (I thought spaghetti would not be strong enough to hold this, as it was quite a heavy decoration for a cupcake.  The linguine was a bit thicker and stronger), and left to dry overnight.  Then when it came time to decorate the cupcake, I simply draped a biggish circle of blue sugarpaste over the cupcake for the skirt, added the poofy bits of the skirt on in a slightly lighter blue (please feel free to admire my superior knowledge of dressmaking terms), and added Cinders to the top, pushing the linguine down into the cupcake to support her.

It was a bit of a rush job getting these cupcakes done this year - I just couldn't get inspired, so I ended up leaving it until the day before the delivery day to start making the decorations!  Luckily everything dried sufficiently, and I was happy with them in the end.

Bring on the cookies!  My cookies I was very happy with - no dramas here, I had a clear vision of how I wanted them to turn out, and they did...


Some of you may recognise the Dragon Claw Cookie (top right), and you'd be right - I originally made this cookie design to enter LilaLoa's Creative Cookie Competition way back in March.  It didn't win then, but guess what?  My cookies DID win at the Show!  Woo hoo!

I also got Second Prize in the "Cake Using Honey" class, but I didn't take a photo of that, because it was pretty boring looking (no icing allowed, etc).  It's a really yummy cake though, and it was based on my Sunny Honey Cupcakes recipe.  If you haven't tried lavender and honey cupcakes yet, then you should totally go and make these immediately - they are really yummy!

As pleased as I am about my Show wins, funnily enough the prizes I was most excited about were two little "Highly Commended" certificates - and they weren't even mine.  Because The Muffin entered two classes this year, and she got Highly Commended for both!  Happy Mummy Dance!  I was SO happy she got this bit of recognition, because she works so hard on her Show cookies, and she's always been so good about saying "I don't mind if I don't win, Mummy - it's fun just entering".  But you know that deep down in her little five-year-old heart, she'd love to win something.

Here are her Decorated Cookies:


I didn't help her at all with these, she did the lot herself, including making the little sugarpaste heart and flower (I did help bake the cookies obviously, but the kids' cookies are not judged on taste, only on appearance - they are even allowed to use store-bought cookies - so the baking part doesn't count in this class).

2012 is Year Of The Farmer, so there were special "Scarecrow" classes this year in every category.  I didn't enter any of these, but The Muffin did enter the kids' special class, which was "Scarecrow Biscuit".  What they had to do was use commercial cookies and lollies to make a picture of a scarecrow, glued down with icing onto a paper plate.  Here is The Muffin's entry:


Congratulations, Muffin!  Your Daddy and I are both so proud of you!

Wednesday, September 26, 2012

Mexican Party Cake

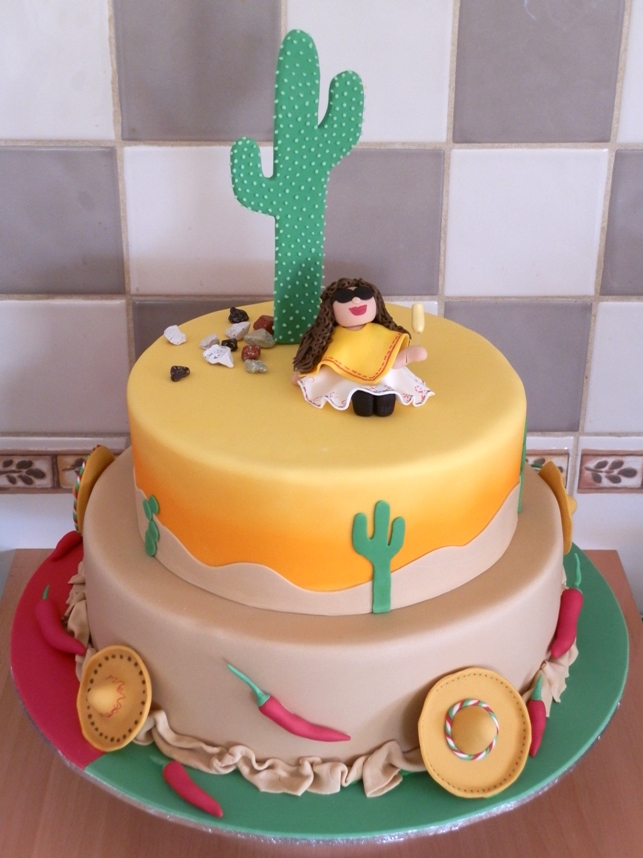
 This is a cake I made for my friend's Mexican-themed 40th birthday party a few weeks ago:


 Here's a closeup of the figure on top:


 My friend is known for her big sunnies, bright red lippie, curly hair and obsession with Doctor Who...


Inside, the bottom layer was chocolate mud cake, and the top layer was Margarita Madeira cake.  The Margarita Madeira was SO good - I will definitely be making it again!  I used my regular Madeira cake recipe, and added lime zest and a little lime juice to the batter, then layered it with Tequila lime syrup and Cointreau-laced French buttercream.  Yum....

Hope you're all having a good week - there'll be lots more sugar around here very soon, as I am currently in the process of making my goodies for the Royal Show - wish me luck!

Tuesday, September 18, 2012

Muffin Tin Monday - Rainbow Magic

The Muffin is a great reader for her age, and recently she has fallen madly in love with the Rainbow Magic fairy books.  These are short novel-style books (or "chapter books", as she calls them).

This week she wanted a Rainbow Magic Fairies theme tin, but she specified that it must only contain references to the fairies she has so far read.  So here goes:


Top Row:  The Pot At The End Of The Rainbow (here represented by a black silicon muffin liner, containing sausages);  Ruby The Red Fairy (strawberries, one of which is cut into a flower shape, even though you can't really see it in the photo.  In the books, each fairy's magic fairy dust turns into something as it falls to the ground.  Ruby's turns into flowers).

Middle Row:  Amber The Orange Fairy (carrot circles - Amber's dust turns into orange bubbles);  Bertram The Frog (bread and butter frog with mini M&M eyes.  There is carrot and apple salad underneath him, too).

Bottom Row:  Saffron The Yellow Fairy (potato casserole with a little cheese butterfly on top - again, you can't really see this very well as it had begun to melt!  Saffron's dust turns into butterflies);  Fern The Green Fairy (spinach leaves.  Fern's dust turns into little leaves).

Plus:  Two sets of rainbow chocolate chips.

The Muffin helped a lot with this tin, as she was very excited about it.  She decided where everything went (ie in strict order of when we discover each thing in the series), and she loaded most of the food into the cups.

The After Shot:

'Nuff said.  To see what other mums did for MTM this week, check out The Muffin Tin Mom's blog.

Related Posts Plugin for WordPress, Blogger...